Home
Home BlogMore Than a Support! Colombina Main DPS Breakdown: The Ultimate Lunar Bloom Guide
More Than a Support! Colombina Main DPS Breakdown: The Ultimate Lunar Bloom Guide
 Quinn Thompson


Core Mechanics
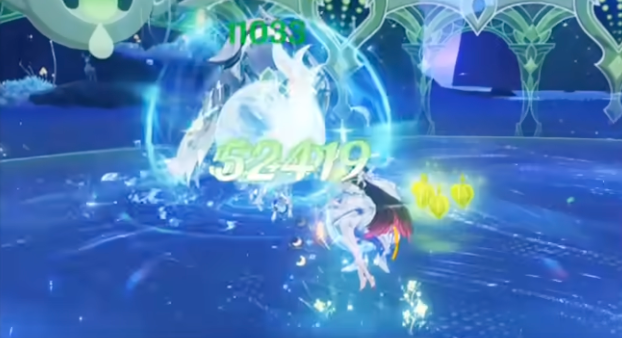
Colombina’s Charged Attack consumes Dewgrass, triggering three instances of Lunar Bloom damage. This damage scales with her Max HP, perfectly matching Lunar Bloom’s damage calculation rules. Her second passive talent, optimizes Dewgrass consumption within her Elemental Burst field, allowing teammates like Lauma to fully stack buffs by holding their Skill — indirectly amplifying Colombina’s own damage output.
Additionally, when the team includes two or more Nod-Krai characters, the Full Radiance state is activated. This grants increased interruption resistance and Elemental Mastery bonuses, significantly improving on-field survivability and raising the team’s overall damage ceiling.
Artifact Recommendations

Night of Manifest Realms (4-Piece)
This is the best-in-slot set for an on-field main DPS Colombina. Under Full Radiance, it provides 30% CRIT Rate along with Lunar reaction damage bonuses, aligning perfectly with her damage profile. Be mindful of CRIT overflow when accounting for team buffs — an overall CRIT Rate around 80% is recommended.
Main & Sub-Stat Priority
Energy Recharge > CRIT Rate > CRIT DMG > HP
Adjust Energy Recharge based on your weapon choice. Sub-stats should prioritize double CRIT, followed by HP. There’s no need to stack Elemental Mastery intentionally, as team supports already provide sufficient EM buffs.
Weapon Recommendations

5-Star Weapons
Nocturne Between Curtains
Colombina’s signature weapon and her definitive endgame option. It significantly boosts HP and Energy Recharge, with passives that synergize perfectly with Lunar reaction gameplay, further enhancing Charged Attack damage. Once Energy Recharge reaches 160%+, you can fully focus on stacking CRIT stats.

4-Star Weapons
The Widsith
A strong choice for burst-oriented builds. Its secondary stat provides Elemental Mastery, and the passive grants massive damage bonuses during its active window. Best suited for short burst rotations — just be mindful of the passive cooldown and plan your damage windows accordingly.
Team Compositions: Maximize Lunar Bloom with Full Radiance

Core Concept
Use Colombina as the on-field main DPS, supported by off-field Dendro units for consistent application, plus flex slots that provide Elemental Mastery or survivability. Crucially, the team must include at least two Nod-Krai characters to activate Full Radiance and unlock the comp’s full potential.
Best-in-Slot Team
Colombina + Lauma + Nilou + Baizhu
Team Breakdown
Colombina and Lauma together activate Full Radiance as dual Nod-Krai characters. Lauma serves as the core off-field Dendro support, offering wide-area Dendro application, Lunar Bloom damage amplification, and Hydro–Dendro RES shred — making her a cornerstone of Lunar Bloom teams. Nilou adds additional damage through Bountiful Cores, pushing Hydro–Dendro reaction output even higher. Baizhu provides consistent healing and shielding, ensuring Colombina can safely maintain on-field uptime.
This team delivers top-tier damage with excellent forgiveness, making it highly effective in both Spiral Abyss and open-world content.
Follow Keygold.gg to get the latest Genshin Impact-related game news as soon as it drops!

- Ver.6.4 Limited-Time Offer$63.99-$36$99.99
- All-In-One Bundle$160.8-$40.14$200.94
- Bless of the Welkin Moon$3.6-$1.39$4.99
- 60 Genesis Crystal$0.71-$0.28$0.99
- 300+30 Genesis Crystal$3.6-$1.39$4.99
- 980+110 Genesis Crystal$10.83-$4.16$14.99
- 1980+260 Genesis Crystal$21.67-$8.32$29.99
- 3280+600 Genesis Crystal$36.12-$13.87$49.99
- 6480+1600 Genesis Crystal$74.99-$25$99.99
- 6480+1600 Genesis Crystal*3$244.97-$55$299.97
- 6480 + 1600 Genesis Crystals*5$414.96-$84.99$499.95
- 6480 + 1600 Genesis Crystals*10$839.92-$159.98$999.9
- 1980+260 Genesis Crystals$21.67-$8.32$29.99