Wuthering Waves 3.4 Build Guide: Lucilla Build | Hiyuki’s Core Frostgrad Sub-DPS
 Casey Morgan


Lucilla is a 5-star Glacio Resonator wielding a Rectifier, debuting in the second half of the Wuthering Waves 3.4 version. As the Principal of the Astralite Academy, she serves as the final pieces of the Hiyuki Frostgrad system, blending off-field support, Res. Shred, DMG amplification, and sub-DPS capabilities.
With an incredibly low investment threshold, she functions perfectly at S0 within system teams, while unlocking a massive power spike at S2. She is an absolute must-build for anyone running a Frostgrad team. This blog will break down her role, skill mechanics, ascension materials, weapons, Echoes, team rotations, and pulling advice. Beginners, F2P, and endgame players alike can copy this build directly.
1. Character Overview

| Category | Detailed Information |
| Attribute / Weapon | 5-Star / Glacio / Rectifier |
| Core Role | Frostgrad System Core Support + Off-Field Sub-DPS |
| Power Spike Resonance Chains | Viable at S0, Complete Power Spike at S2, Fully Maxed at S6 |
| Core Mechanics | Frostgrad Stacking, Memory Remnant Coordinated Attacks, Team Glacio DMG Bonus, Enemy Glacio Res. Shred |
| Best Teams | Exclusively tailored for the Hiyuki Frostgrad team; highly viable for other Glacio DPS teams |
2. Core Skill Mechanics At a Glance
Lucilla's gameplay revolves around landing Perfect Focus + stacking Frostgrad via Remnants + bursting down enemies during her Resonance Liberation state. Her combos are straightforward and highly rewarding once you master the basic rotation.
| Skill Type | Core Effect | Tactical Role |
| Basic Attack (Focus Mechanic) | 3-segment Basic Attacks can be held to Focus. Perfect Focus fully restores Impression, triggers Remnants, and grants extra Energy. | Builds Energy, triggers passive DMG buffs, and ensures a smooth skill rotation. |
| Resonance Skill (E) | Releases Memory Fragments dealing AoE Glacio DMG, inflicts Frostgrad, and generates a following Remnant for Coordinated Attacks. | Core method to apply Frostgrad, sustains off-field DPS, and sets up DMG amplification. |
| Resonance Liberation (Q) | Consumes 80 Energy to enter Phase-2 state for 15s, boosting her own DMG, shredding Glacio Res., and leaving a 5s Remnant upon switching out. | Opens the team's burst window, maximizing Hiyuki's overall damage output. |
| Inherent Skill (Passive) | Grants Team Glacio DMG Bonus, increases Remnant DMG, restores Focus Energy, and provides Resonance Efficiency bonuses. | Comprehensively raises the ceiling of Frostgrad teams, balancing DPS and rotation uptime. |
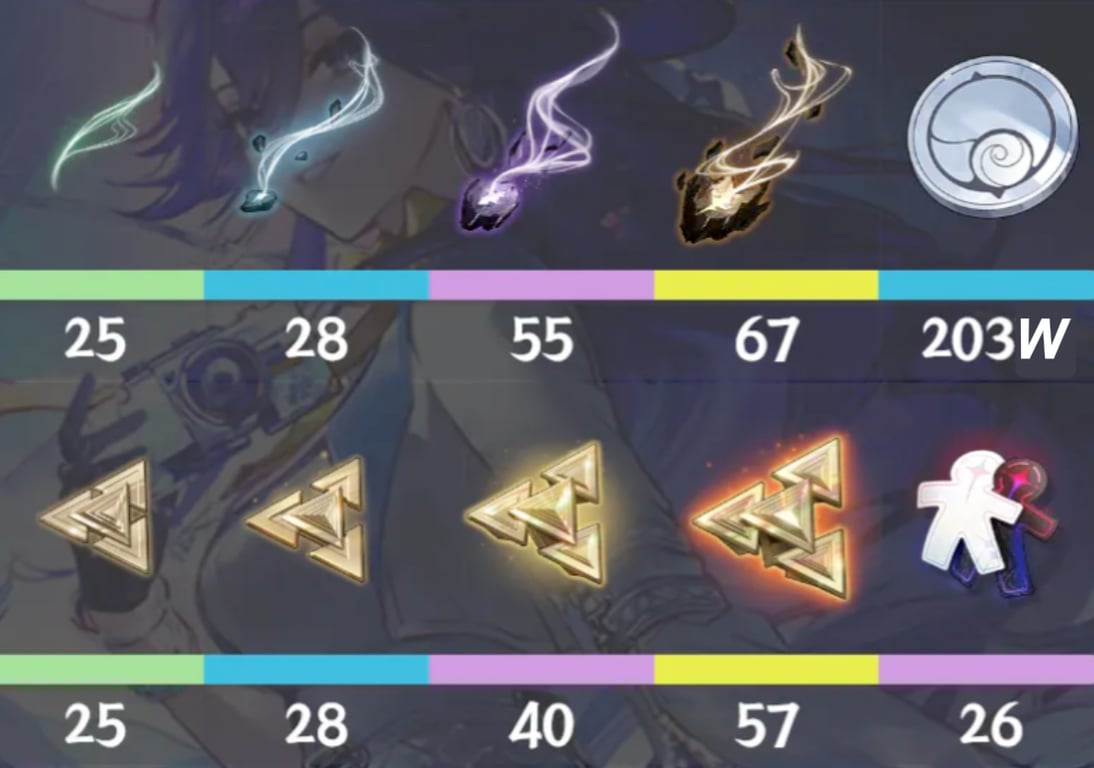
3. Total Ascension & Forte Materials
1. Level 90 Ascension Materials
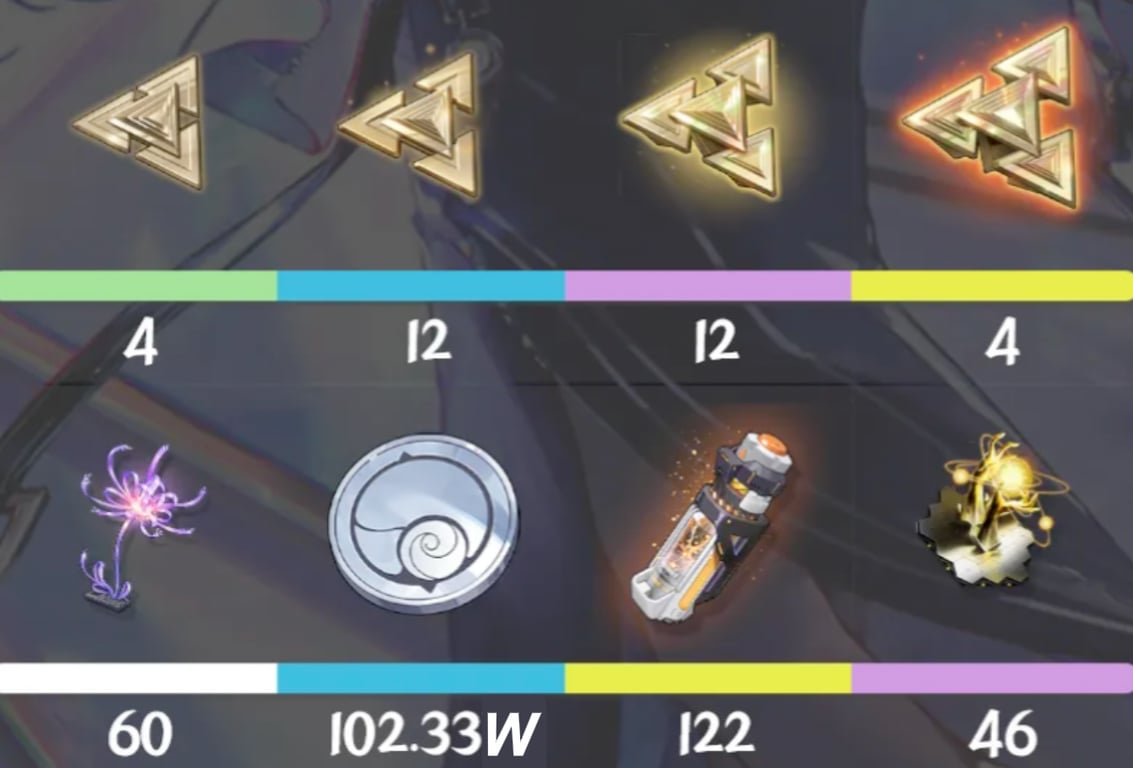
2. Level 10 Forte Upgrade Materials
3. Material Farming Priority
Core Priority: Resonator Ascension > Forte Upgrades > Echo Farming
Farming Checklist: Weekly Boss (Challenge: Bell-Borne Geochelone) > Daily Forgery Challenge (Misty Forest) > World Boss Sun-bringer > Overworld Gathering (Wistful Meadow & Whisperin Cores)
4. Weapon Recommendations
| Tier | Weapon Name | Reasons for Synergy | Target Audience |
| T0 Best-in-Slot |
 "Save the Frame" (5-Star Signature) "Save the Frame" (5-Star Signature)
|
ATK: 587 / Crit Rate: 24.30% Increases ATK by 12%. Upon inflicting Frostgrad, increases self Glacio DMG Bonus by 30% for 12s; team members' ATK increases by 24% for 30s (cannot stack with same-name effects). | Endgame players, min-maxers chasing the highest team ceiling. |
| General Alternative |
 "Aura of the Glacial Branches" (5-Star) "Aura of the Glacial Branches" (5-Star)
|
ATK: 500 / Crit DMG: 72.00% Increases ATK by 12%. Casting Resonance Skill grants a buff: self Basic Attack DMG Bonus increases by 12% while on-field, stacking up to 3 times for 6s. Upon casting Outro Skill at max stacks, consumes all stacks to grant off-field Basic Attack DMG Bonus by 52% for 27s. | High-investment players lacking the signature weapon. |
| Best F2P Choice |
 "Record of the Surging Ripples" (5-Star) "Record of the Surging Ripples" (5-Star)
|
Resonance Efficiency increases by 12.8% Dealing Basic Attack DMG increases Basic Attack DMG Bonus by 3.2%, stacking up to 5 times for 8s (triggered once every 0.5s). Easy to acquire from the standard weapon banner. | F2P and low-spending casual players. |
5. Echo Sets & Sub-Stats Guide
| Sonata Effect | Set Bonus | Ideal Scenarios |
| Best-in-Slot: Whisper of the Falling Snow (5-Piece) |
When the Resonator inflicts [Frostgrad] on an enemy, Glacio DMG increases by 10% for 15s. Gains the [Snowfall] effect for 15s (cooldown 25s). While [Snowfall] is active: · Dealing Resonance Liberation DMG consumes [Snowfall] to increase self Crit Rate by 25% for 6s. Dealing Resonance Liberation DMG during this buff extends its duration by 4s (triggered once every 0.5s, max 6 extensions). · Casting Outro Skill consumes [Snowfall] to increase the next incoming Resonator's Glacio DMG by 25% for 15s. Only one effect can be triggered per [Snowfall] consumption. Perfectly matches Lucilla's core kit. |
Mainstay for the Hiyuki Frostgrad team; endgame min-maxed build. |
| F2P Transition: 2-Pc Glacio + 2-Pc ATK | Increases Glacio DMG and Base ATK; dramatically lowers the difficulty of farming optimal sub-stats. | Beginners, transitional phase for quick deployment. |
• Cost Composition: 43311 provides a flawless balance of team utility, personal sub-DPS output, and rotation comfort.
- Main Stats: 4-Cost (Crit Rate / Crit DMG) > 3-Cost (Glacio DMG Bonus / ATK%) > 1-Cost (ATK%).
- Sub-Stats Priority: Crit Rate / Crit DMG > ATK% > Resonance Liberation DMG Bonus > Resonance Efficiency. Aim for roughly 120% Resonance Efficiency to secure smooth rotations.
6. Team Compositions: Hiyuki Premium Glacio Team
Premium Meta Team

Hiyuki + Lucilla + The Shorekeeper / Verina
- Hiyuki: Main Glacio DPS, the centerpiece of the Frostgrad system, responsible for massive on-field burst windows.
- Lucilla: Glacio Support/Sub-DPS, handles off-field Glacio application and provides substantial Glacio DMG buffs, completing the Frostgrad puzzle.
- The Shorekeeper / Verina: Healer/Buffer. The Shorekeeper delivers prolonged buffs and invaluable Crit Rate amplification, while Verina functions as a highly reliable universal team-wide DMG buffer.
This is Lucilla's absolute best team composition. Her off-field setup and Glacio amplification synergize flawlessly with Hiyuki's primary damage output, making even an S0 Lucilla highly effective. Currently, this team boasts the highest performance ceiling within the Frostgrad system, offering seamless shield/healing uptime and incredible Vibra Armor depletion—making it ideal for challenging endgame content like the Tower of Adversity.
Standard Combat Rotation
Summary & Pulling Advice
- Pulling Advice: Players who already own Hiyuki should absolutely secure at least an S0 Lucilla. If you want to push the team's ceiling to the absolute limit, aiming for her S2 power spike is highly recommended. Pulling her without owning Hiyuki is generally discouraged due to her specialized niche within Frostgrad setups. Her signature weapon holds higher priority than her early Resonance Chains; thus, an S0+R1 setup offers the highest value. If you need extra Astrite or Lunites to secure this perfect setup, utilizing a reliable platform for a wuwa top up is an excellent way to fast-track your team's completion.
- Forte Upgrades: Level 90 > Core Fortes 8/8/10 > Resonance Efficiency to 120% > Farm Whisper of the Falling Snow Echoes with double Crit lines.
- Final Verdict: Lucilla stands as the definitive, irreplaceable core support for the Frostgrad system. At S0, her entire supportive toolkit—including Res. Shred, team DMG buffs, and Frostgrad application—is fully unlocked. Her S2 introduces a massive boost to her personal off-field damage. Balancing stellar support utility with sub-DPS capabilities, she is easily one of the most valuable system-defining units to invest in for the 3.4 patch.
Follow me for more latest news and useful guides about Wuthering Waves! If you want to get your favorite characters and in-game resources, visit keygold.gg for great deals.
FAQ
Q1:Is Lucilla strictly locked to Hiyuki teams?
A: Not strictly. She can be paired with other Glacio primary attackers like Sanhua or Lingyang. However, only a dedicated Hiyuki Frostgrad team can fully capitalize on her specific stacking and amplification mechanics. Outside of this system, her stacking advantages drop off significantly, reducing her priority over general supports.
Q2:Is an S0 Lucilla worth fully leveling and investing in?
A: Absolutely. At S0, she already possesses her entire core supportive arsenal: Res. Shred, team-wide buffs, and Frostgrad application are completely accessible. The only trade-off is slightly lower personal damage, making her a highly stable, plug-and-play choice for daily domains, high-difficulty bosses, and the Tower of Adversity.
Q3:How much Resonance Efficiency does Lucilla need?
A: Maintaining around 120% is optimal. This ensures her Resonance Liberation is ready on every single cooldown rotation without oversaturating her stats, allowing you to prioritize the remaining sub-stat slots on Crit Rate and Crit DMG.


- 6480 + 1600 Lunites Limited Offer$71.99-$28$99.99
- Lunitas All-In-One Bundle$164.82-$36.12$200.94
- Insider Channel$7.39-$2.6$9.99
- Connoisseur Channel$14.78-$5.21$19.99
- Lunite Subscription$3.69-$1.3$4.99
- 60 Lunites$0.73-$0.26$0.99
- 300 Lunitas$3.69-$1.3$4.99
- 980+110 Lunites$11.08-$3.91$14.99
- 1980+260 Lunites$22.18-$7.81$29.99
- 3280+600 Lunites$36.97-$13.02$49.99
- 6480+1600 Lunites$76.99-$23$99.99
- 6480+1600 Lunites*3$250.97-$49$299.97
- 6480+1600 Lunites*5$424.96-$74.99$499.95
- 6480+1600 Lunites*10$859.91-$139.99$999.9
- Weekly Subscription$7.39-$2.6$9.99
- Lunar Causality$7.39-$2.6$9.99
- Horizon Lookout$7.39-$2.6$9.99
- Voyaging Star Chassis Set$18.48-$6.51$24.99