
WOS: 화이트아웃 서바이벌 미궁 – Gaia Heart 편성 가이드 (막혔을 때)
 하윤
하윤


Gaia Heart는 단순한 전투력 체크가 아닌 편성 구조와 피해 분산을 요구하는 미궁 핵심 구간입니다. 본 가이드는 많은 플레이어가 실제로 활용한 안정적인 기준 편성을 통해, 전열 붕괴 문제와 전투 흐름을 개선하는 방법을 설명하고 중·후반 미궁 진행에서의 효율적인 선택 기준을 제시합니다.
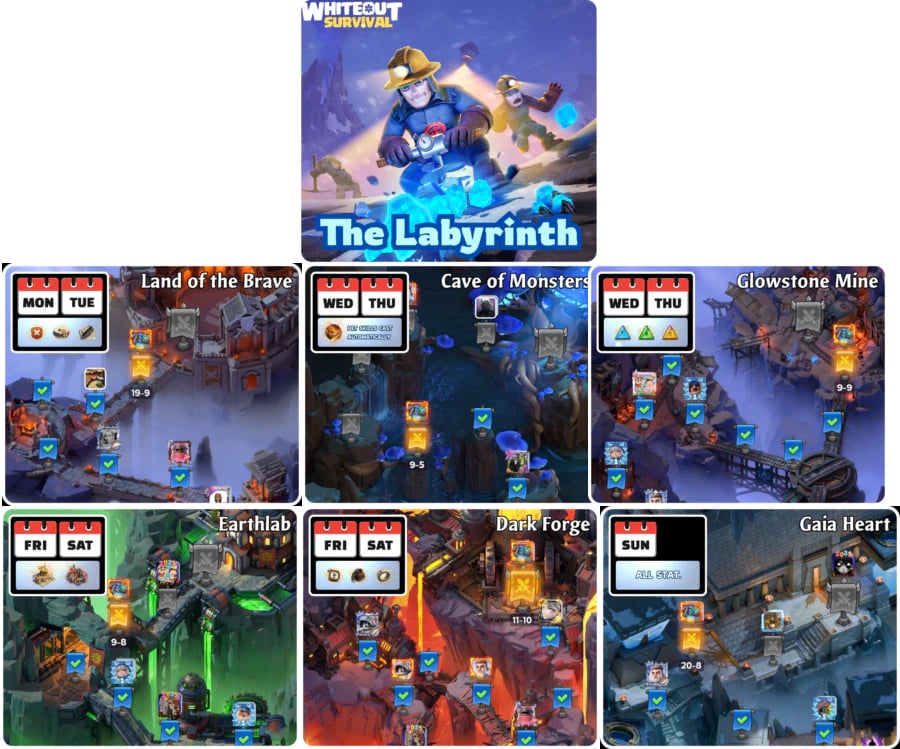
WOS: 화이트아웃 서바이벌의 미궁 콘텐츠에서 Gaia Heart 구간은 많은 플레이어가 한 번쯤 반드시 막히는 대표적인 구간입니다.
그 이유는 단순한 전투력 부족이 아니라, 잘못된 편성 논리를 조용하지만 가혹하게 처벌하는 구조에 있습니다.
많은 플레이어는 영웅만 충분히 강해지면 Gaia Heart도 언젠가는 돌파할 수 있다고 생각합니다.
하지만 실제로는 이 스테이지가 훨씬 냉정합니다. 병력 비율이나 역할 배치에서 발생한 작은 실수 하나가, 영웅 성능이 충분하더라도 전투 전체를 무너뜨릴 수 있습니다.
이 가이드는 “무조건 클리어”를 보장하는 공략이 아닙니다.
대신, 막혔을 때 많은 플레이어가 실제로 돌파에 성공했던 안정적인 기준 편성을 제시하고, 더 나아가 왜 막히고 있는지 이해하도록 돕는 것을 목표로 합니다.
Gaia Heart가 유독 가혹하게 느껴지는 이유
Gaia Heart는 단순한 전투력 체크 구간이 아닙니다.
이 스테이지는 편성 구조와 피해 분산 구조를 동시에 검사합니다.
전투 내내 다음 세 가지 압박이 동시에 작동합니다.
혼합 피해를 버텨야 하는 전방 라인의 지속 생존력
순간적인 압박에 흔들리지 않는 중열 안정성
과도한 노출 없이 유지되어야 하는 후열 딜 유지 시간
이 중 어느 한 축이라도 너무 일찍 붕괴되면, 전투는 눈덩이처럼 무너지기 시작합니다.
그래서 비슷한 영웅과 전투력을 가진 플레이어라도 결과가 크게 갈리는 것입니다.
Gaia Heart를 위한 신뢰도 높은 기준 편성
아래 편성은 모든 상황에 통용되는 만능 해답은 아닙니다.
하지만 영웅 부족이 아닌 구조 문제로 인해 진행이 막힌 플레이어에게는 매우 강력한 출발점이 됩니다.
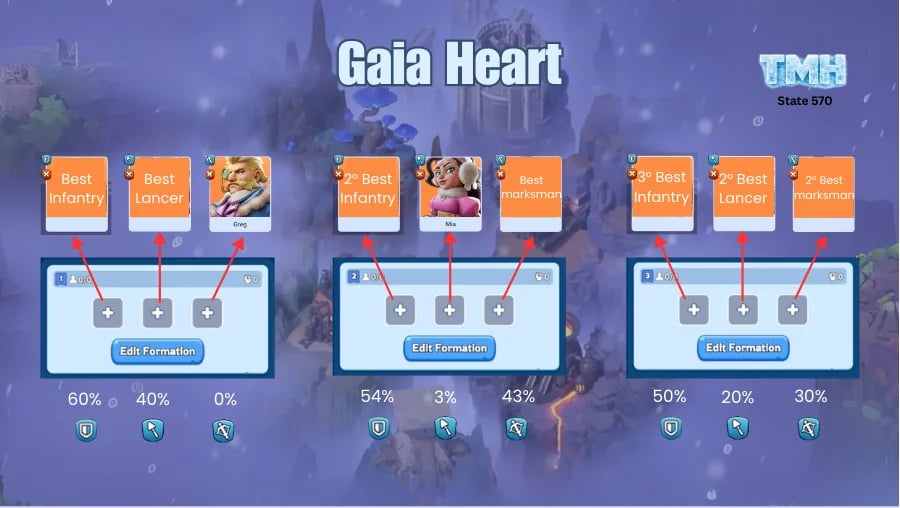
권장 기본 구조
전열: 최상급 보병 + 최상급 창병
중열: 최상급 보병 + 최상급 사수
후열: 최상급 보병 + 최상급 창병 + 최상급 사수
이 편성의 핵심은 폭딜이 아니라 피해 흡수와 분산입니다.
어느 한 라인도 너무 빨리 무너지지 않도록 만드는 것이 목적입니다.
이 편성이 효과적인 이유
보병을 여러 라인에 배치해 리스크를 분산
창병의 압박을 한쪽에 몰지 않고 전반적으로 분산
초반 압박이 줄어들어 사수가 더 오래 안정적으로 딜 가능
실제로 많은 플레이어가 편성 논리만 바로잡았을 뿐인데, 이전에는 절대 못 깼던 전투가 안정적으로 풀렸다고 말합니다.
이 편성이 특히 잘 맞는 경우
이 구조는 다음과 같은 상황에서 특히 효과적입니다.
미드 게임 구간에서 초·중반 미궁 세대를 진행 중인 플레이어
전투가 충분히 전개되기도 전에 패배하는 경우
전열이 너무 빨리 붕괴되는 문제가 반복되는 상황
만약 미궁의 매우 후반 세대까지 진행했다면, 스케일링 영향으로 결과 편차가 커질 수 있습니다.
이 단계에서는 편성이 맞더라도 추가적인 내구도나 효율 조정이 필요할 수 있습니다.
승리 전에 편성이 맞는지 판단하는 방법
완전 클리어가 아니어도, 방향이 맞는지는 충분히 알 수 있습니다.
편성이 제대로 작동하고 있다는 신호는 다음과 같습니다.
전열이 전투 중반까지 생존한다
시간이 지날수록 딜이 올라가고, 초반에 무너지지 않는다
패배하더라도 일방적인 패배가 아니라 “아쉬운 패배”에 가깝다
만약 전열이 중반 이전에 무너진다면, 문제는 비율이 아니라 미궁 스케일 대비 실질 내구도 부족일 가능성이 큽니다.
이 차이를 이해하는 것이 매우 중요하며, 같은 편성인데도 성공과 실패가 갈리는 이유이기도 합니다.
효율, 진행 속도, 그리고 장기 플레이
어느 시점부터 Gaia Heart는 무작정 밀어붙이는 콘텐츠가 아니라, 시도 1회당 효율을 따지는 구간이 됩니다.
일부 플레이어는 속도를 늦추고 로테이션을 조정합니다.
또 다른 플레이어는 자원 운용을 최적화하거나, 경우에 따라 WOS: 화이트아웃 서바이벌 충전 같은 선택지를 활용해 실패 시도를 줄이고 이미 투자한 시간을 보호하기도 합니다.
어느 쪽도 틀린 선택은 아닙니다.
중요한 것은 편성 문제의 끝과 스케일 문제의 시작을 구분하는 것입니다.
마무리 생각
Gaia Heart는 우연히 깰 수 있도록 설계된 구간이 아닙니다.
이 스테이지는 편성 논리, 피해 흐름, 생존 타이밍을 이해한 플레이어에게 보상을 줍니다.
이 가이드는 확답이 아니라 안정적인 기준선을 제공합니다.
바로 통하면 좋고, 그렇지 않더라도 왜 막히는지에 대한 명확한 이유를 얻게 될 것입니다.
그리고 WOS: 화이트아웃 서바이벌의 미궁에서는,
그 “이해” 자체가 진짜 돌파구가 되는 경우가 많습니다.


- 0.99 선택 패키지$0.77-$0.23$0.99
- 1.99 선택 패키지$1.53-$0.46$1.99
- 2.99 선택 패키지$2.29-$0.7$2.99
- 3.99 선택 패키지$3.06-$0.93$3.99
- 4.99 선택 패키지$3.83-$1.16$4.99
- 9.99 선택 패키지$7.64-$2.35$9.99
- 19.99 선택 패키지$15.29-$4.7$19.99
- 49.99 선택 패키지$38.24-$11.75$49.99
- 99.99 선택 패키지$79.99-$20$99.99
- 올인원 스탠다드 패키지$156.46-$28.49$184.95
- 영웅의 전당 – 용맹 패키지 올인원$156.46-$28.49$184.95
- 아이스 피싱 클럽 – 낚시 프로 & 마스터$11.46-$3.52$14.98
- 낚시 프로 세트 올인원$186.11-$31.79$217.9
- 럭키 칩 패키지 올인원$68.26-$18.69$86.95
- 엔िग마 보석 패키지 올인원$160.04-$28.89$188.93
- 만상 바자 올인원 패키지$340.02-$48.89$388.91
- 499.99 선택 패키지$439.99-$60$499.99
- 999.99 선택 패키지$889.99-$110$999.99