";inherits:false;initial-value:#0000}@property --tw-gradient-via{syntax:"";inherits:false;initial-value:#0000}@property --tw-gradient-to{syntax:"";inherits:false;initial-value:#0000}@property --tw-gradient-stops{syntax:"*";inherits:false}@property --tw-gradient-via-stops{syntax:"*";inherits:false}@property --tw-gradient-from-position{syntax:"";inherits:false;initial-value:0}@property --tw-gradient-via-position{syntax:"";inherits:false;initial-value:50%}@property --tw-gradient-to-position{syntax:"";inherits:false;initial-value:100%}@property --tw-leading{syntax:"*";inherits:false}@property --tw-font-weight{syntax:"*";inherits:false}@property --tw-shadow{syntax:"*";inherits:false;initial-value:0 0 #0000}@property --tw-shadow-color{syntax:"*";inherits:false}@property --tw-shadow-alpha{syntax:"";inherits:false;initial-value:100%}@property --tw-inset-shadow{syntax:"*";inherits:false;initial-value:0 0 #0000}@property --tw-inset-shadow-color{syntax:"*";inherits:false}@property --tw-inset-shadow-alpha{syntax:"";inherits:false;initial-value:100%}@property --tw-ring-color{syntax:"*";inherits:false}@property --tw-ring-shadow{syntax:"*";inherits:false;initial-value:0 0 #0000}@property --tw-inset-ring-color{syntax:"*";inherits:false}@property --tw-inset-ring-shadow{syntax:"*";inherits:false;initial-value:0 0 #0000}@property --tw-ring-inset{syntax:"*";inherits:false}@property --tw-ring-offset-width{syntax:"";inherits:false;initial-value:0}@property --tw-ring-offset-color{syntax:"*";inherits:false;initial-value:#fff}@property --tw-ring-offset-shadow{syntax:"*";inherits:false;initial-value:0 0 #0000}@property --tw-outline-style{syntax:"*";inherits:false;initial-value:solid}@property --tw-blur{syntax:"*";inherits:false}@property --tw-brightness{syntax:"*";inherits:false}@property --tw-contrast{syntax:"*";inherits:false}@property --tw-grayscale{syntax:"*";inherits:false}@property --tw-hue-rotate{syntax:"*";inherits:false}@property --tw-invert{syntax:"*";inherits:false}@property --tw-opacity{syntax:"*";inherits:false}@property --tw-saturate{syntax:"*";inherits:false}@property --tw-sepia{syntax:"*";inherits:false}@property --tw-drop-shadow{syntax:"*";inherits:false}@property --tw-drop-shadow-color{syntax:"*";inherits:false}@property --tw-drop-shadow-alpha{syntax:"";inherits:false;initial-value:100%}@property --tw-drop-shadow-size{syntax:"*";inherits:false}@property --tw-backdrop-blur{syntax:"*";inherits:false}@property --tw-backdrop-brightness{syntax:"*";inherits:false}@property --tw-backdrop-contrast{syntax:"*";inherits:false}@property --tw-backdrop-grayscale{syntax:"*";inherits:false}@property --tw-backdrop-hue-rotate{syntax:"*";inherits:false}@property --tw-backdrop-invert{syntax:"*";inherits:false}@property --tw-backdrop-opacity{syntax:"*";inherits:false}@property --tw-backdrop-saturate{syntax:"*";inherits:false}@property --tw-backdrop-sepia{syntax:"*";inherits:false}@property --tw-duration{syntax:"*";inherits:false}@property --tw-ease{syntax:"*";inherits:false}@property --tw-scale-x{syntax:"*";inherits:false;initial-value:1}@property --tw-scale-y{syntax:"*";inherits:false;initial-value:1}@property --tw-scale-z{syntax:"*";inherits:false;initial-value:1}@keyframes pulse{50%{opacity:.5}}
中文繁體
登入 / 註冊
keygold invite coupon新註冊用戶專享註冊領取優惠券
keygold home主站keygold arrow-right網誌keygold arrow-right寒霜啟示錄 迷宮攻略|Gaia Heart(蓋亞之心)陣容配置解析(卡關必看)
keygold search

寒霜啟示錄 迷宮攻略|Gaia Heart(蓋亞之心)陣容配置解析(卡關必看)

keygold blog author邱星禾
2026/01/15
keygold facebook sharekeygold reddit sharekeygold twitter sharekeygold whatsapp share
keygold link

在《寒霜啟示錄》的迷宮玩法中,Gaia Heart(蓋亞之心,迷宮關卡) 是玩家最常遇到的卡關點之一。
這並不是因為戰力不足,而是因為這一關對陣容結構的容錯率極低

許多玩家會認為,只要英雄強度夠高,Gaia Heart 遲早能過。但實際上,這個關卡對站位、兵種分佈與承傷節奏的要求非常嚴格——哪怕英雄不差,只要配置邏輯錯誤,戰鬥就會迅速崩盤。

這篇文章不是「保證通關」的速成公式。
它提供的是一套穩定、可複製的基準陣容思路,幫助你在卡關時找出問題,並理解自己為什麼會被擋在這一關。

1.webp

1

為什麼 Gaia Heart 會讓人覺得特別殘酷?

Gaia Heart 並不是單純的數值檢測關卡。
它真正考驗的是 傷害分佈與陣容穩定度

這個關卡同時對三個層面施壓:

  • 前排在混合傷害下的持續生存能力

  • 中排在壓力波動時的穩定度

  • 後排在不過早被點名的情況下維持輸出

只要其中任一層過早崩潰,戰鬥就會迅速失控。
這也是為什麼英雄差不多、戰力相近的玩家,實戰結果卻天差地遠。

2

一套可靠的 Gaia Heart 基準陣容配置

以下陣容不是萬用解,但對因配置邏輯錯誤而卡關的玩家,是一個非常穩定的起點。
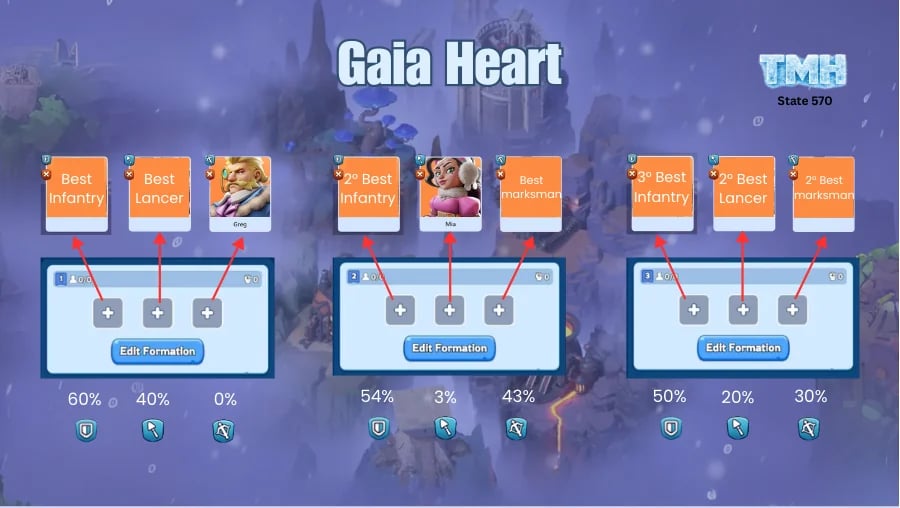
建議陣容結構

  • 前排:最強步兵 ×1 + 最強騎兵 ×1

  • 中排:最強步兵 ×1 + 最強射手 ×1

  • 後排:最強步兵 ×1 + 最強騎兵 ×1 + 最強射手 ×1

這套配置的核心不是爆發,而是傷害吸收與風險分散,避免單一路線過早被打穿。

3

為什麼這樣配置能穩住戰局?

這套陣容有效的原因在於結構本身:

  • 步兵分佈在多條戰線,避免單點承傷過重

  • 騎兵壓力被分散,不會集中暴露

  • 射手能在較低早期壓力下維持更長時間輸出

不少玩家發現,只要修正站位與兵種邏輯,即使英雄沒有更換,原本「完全打不動」的戰鬥也會突然穩定下來。

4

這套陣容最適合哪些玩家?

這個配置特別適合以下情況:

  • 正處於迷宮中前期推進階段的玩家

  • 戰鬥常在中段前就崩盤

  • 前排過早倒下導致整體潰敗

如果你已經進入迷宮後期世代,關卡數值成長會明顯放大,屆時即使陣容邏輯正確,也可能需要額外的耐久或效率調整。

5

還沒通關,也能判斷陣容是否「走對路」

你不一定要立刻通關,才能知道調整是否有效。

如果陣容正在改善,通常會出現這些跡象:

  • 前排能撐過戰鬥中段

  • 輸出曲線逐步拉升,而非過早斷崖式下滑

  • 失敗時感覺「差一點」,而不是完全被碾壓

如果前排仍在早期就瓦解,問題往往不在比例,而是整體耐久與關卡成長曲線之間的落差。

6

效率、進度與長期選擇

到了某個階段,Gaia Heart 比拼的已不再是硬拚,而是單次嘗試的效率

有些玩家選擇放慢節奏,反覆微調配置;
也有玩家會從整體進度角度思考,透過資源規劃,或在合適時機搭配 寒霜啟示錄 儲值,降低無效嘗試,保護自己已投入的時間。

這兩種選擇都沒有對錯。
關鍵在於分清楚:你卡住的是「配置問題」,還是「關卡成長問題」。

2.webp

結語

Gaia Heart 並不是隨便就能過的關卡。
它獎勵的是對陣容邏輯、傷害流向與生存節奏有理解的玩家。

這篇攻略提供的是一個穩定基準,而不是承諾。
如果它讓你立刻突破,那很好;
如果沒有,它至少能幫你清楚知道——你為什麼會卡在這裡。

而在《寒霜啟示錄》的迷宮玩法中,理解本身,往往才是真正的突破點