Genshin Impact Sandrone Guide: Best Builds, Teams & Materials
 Riley Carter


Sandrone, the 7th of the Fatui Harbingers, has officially arrived as a powerhouse off-field Cryo sub-DPS unit. This comprehensive breakdown covers her native 19.2% CRIT Rate scaling, optimal 100% efficiency gear setups like Disenchantment in Deep Shadow, complete Ascension costs, and premium team compositions featuring Escoffier, Wriothesley, and Yae Miko. Perfect your setup and optimize your account to unleash the Puppet Master.
Sandrone, the 7th of the Fatui Harbingers, has officially arrived, and she is completely rewriting the rules of Cryo-based sub-DPS and cooperative setups.
Whether you are trying to understand her unique automated mechanics or trying to figure out if she’s worth your hard-earned Primogems, this definitive breakdown has you covered. Let’s dive straight into the numbers, the exact progression materials, the gear, and the absolute best team compositions validated by top theorycrafters.
The Lore: Who is the Puppet Master?
Sandrone—internally known within the Shuming and Snezhnayan courts as Marionette—is an elite 5-star Cryo unit who commands a massive, sentient mechanical automaton on the battlefield. Far from being a passive background observer, her lore directly ties into the apex engineering of Fontaine and Snezhnaya. On the field, her animations are an elegant yet chilling display of authority, where she directs her mechanical beast to execute high-impact, coordinated strikes while she gracefully controls the pacing from safety.
Mechanics & Kit Deep Dive: How She Dictates the Field
Sandrone operates primarily as a high-frequency, off-field Cryo sub-DPS and dynamic buffer. She scales directly with a massive 19.2% CRIT Rate bonus natively upon reaching maximum Ascension level 90.
Elemental Skill (E): Automated Symphony – Sandrone commands her puppet to perform an initial sweeping AoE Cryo slam, deploying a persistent automated field. While active, the puppet triggers coordinated Cryo slashes whenever your active character inflicts damage, generating exceptional particle economy and seamless elemental application.
Resonance Liberation (Q): Fatal Recital – She unleashes the full processing power of her mechanical core, creating a massive Cryo explosion that scales directly off her maximum stat thresholds. More importantly, this ultimate raises the ceiling on elemental status application, allowing your team to abuse high-multiplier reactions without drop-off.
Sandrone Best Build: Artifacts & Weapon Blueprints
Best Artifact Set: Disenchantment in Deep Shadow is her absolute, undisputed Best-in-Slot (BiS) setup, operating at a perfect 100% performance baseline.
Alternative Options: If you are still farming her main domain, A Day Carved From Rising Winds sits at a viable 79% efficiency (offering a massive 43% ATK bonus, though she won't benefit from its internal CRIT metrics), followed closely by a Gladiator's Finale and Shimenawa's Reminiscence hybrid setup at 74%.
Stat Priority: CRIT DMG / CRIT Rate > ATK% > Energy Recharge
Best Weapons: Her signature 5-star weapon is the undisputed top tier, offering massive CRIT values and a passive that amplifies party-wide elemental damage based on off-field skill procs. For free-to-play (F2P) options, high-refinement 4-star options like The Widsith keep her highly competitive.
Ascension & Talent Prep: Total Material Costs
Planning to max her out on day one?
Character Ascension (Lv. 1–90 Totals):
- Mora: 420,000
- Boss Material: 46x Plume of the Fallen Watcher
- Cryo Gems: 1x Shivada Jade Sliver / 9x Fragment / 9x Chunk / 6x Gemstone
- Local Specialty: 168x Subdetection Unit
- Enemy Drops: 18x Broken Drive Shaft / 30x Reinforced Drive Shaft / 36x Precision Drive Shaft
Talent Leveling (Per Single Lv. 10 Talent):
- Mora: 1,625,500
- Special Items: 1x Crown of Insight / 6x Madman's Restraint (Weekly Boss Drop)
- Domain Books: 3x Teachings of Vagrancy / 21x Guide to Vagrancy / 38x Philosophies of Vagrancy
- Enemy Drops: 6x Broken Drive Shaft / 22x Reinforced Drive Shaft / 31x Precision Drive Shaft
The Meta Team Lineups: Optimal Synergies
When it comes to high-tier endgame content like the Spiral Abyss, blind-slotting characters will only get you so far. According to the breakdown on the Reddit theorycrafting channels and verified meta-tracking tools, Sandrone reaches her broken tier when paired with aggressive elemental drivers and elite debuffers.
Here are the two premium team compositions you should be running:
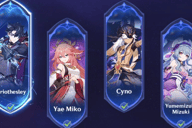
Team 1: The Premium Dual-Element Hyper-Carry Setup

This team relies on maximum raw stat scaling and unstoppable off-field coordination:
Sandrone (Cryo Sub-DPS): Applies consistent off-field Cryo application and heavy skill scaling.
Escoffier (Cryo Battery/Utility): Secures Cryo Resonance, increases the team’s CRIT Rate against frozen or Cryo-affected targets, and handles particle management.
Yae Miko (Electro Enabler): Unloads continuous, automated turret damage to seamlessly trigger Superconduct or high-frequency physical/elemental shreds.
Xilonen (Geo Support/Buffer): Deploys elite defensive shredding and universal elemental damage amplification, locking down absolute survival and multi-layered damage scaling.
Team 2: The High-Octane Cryo Brawler Comp

This lineup focuses on maximizing heavy vertical physical and elemental penetration frames:
Sandrone (Cryo Sub-DPS): Maintains permanent off-field pressure while the primary carry takes center stage.
Wriothesley (Cryo Main DPS): Acts as the primary driver, abusing his rapid-fire Cryo infused catalyst strikes to completely demolish target hitboxes.
Yae Miko (Electro Enabler): Guarantees constant off-field Electro field presence, ensuring the enemy team’s physical and elemental defenses remain permanently compromised.
Nicole (Pyro Utility/Buffer): Triggers crucial forward Melt opportunities while injecting sharp offensive buffs right into Wriothesley’s main combat windows.
Will You Pull for Sandrone?
Are you skipping the current banners to save every single Primogem for Sandrone, or is your credit card already locked and loaded for her C1 and signature weapon? Do you have enough Subdetection Units pre-farmed to max her out instantly? Drop your planned team setups and material progress in the comments below!
Pro-Tip: If you want to bypass the grinding loop and instantly lock down her high-tier constellations or max out her signature weapon on day one, finding a reliable platform for a Genshin top up is the most efficient route. Securing a trusted Genshin Impact top up ensures your account infrastructure is fully loaded with premium Genesis Crystals the exact second her banner phase drops. Let the puppet show begin!


- All-In-One Bundle$160.8-$40.14$200.94
- Blessing of the Welkin Moon$3.82-$1.17$4.99
- 60 Genesis Crystals$0.77-$0.23$0.99
- 300+30 Genesis Crystals$3.6-$1.39$4.99
- 980+110 Genesis Crystals$10.83-$4.16$14.99
- 1980+260 Genesis Crystals$21.67-$8.32$29.99
- 3280+600 Genesis Crystals$36.12-$13.87$49.99
- 6480+1600 Genesis Crystals$74.99-$25$99.99
- 6480+1600 Genesis Crystal*3$244.97-$55$299.97
- 6480 + 1600 Genesis Crystals*5$414.96-$84.99$499.95
- 6480 + 1600 Genesis Crystals*10$839.92-$159.98$999.9