";inherits:false;initial-value:#0000}@property --tw-gradient-via{syntax:"";inherits:false;initial-value:#0000}@property --tw-gradient-to{syntax:"";inherits:false;initial-value:#0000}@property --tw-gradient-stops{syntax:"*";inherits:false}@property --tw-gradient-via-stops{syntax:"*";inherits:false}@property --tw-gradient-from-position{syntax:"";inherits:false;initial-value:0}@property --tw-gradient-via-position{syntax:"";inherits:false;initial-value:50%}@property --tw-gradient-to-position{syntax:"";inherits:false;initial-value:100%}@property --tw-leading{syntax:"*";inherits:false}@property --tw-font-weight{syntax:"*";inherits:false}@property --tw-shadow{syntax:"*";inherits:false;initial-value:0 0 #0000}@property --tw-shadow-color{syntax:"*";inherits:false}@property --tw-shadow-alpha{syntax:"";inherits:false;initial-value:100%}@property --tw-inset-shadow{syntax:"*";inherits:false;initial-value:0 0 #0000}@property --tw-inset-shadow-color{syntax:"*";inherits:false}@property --tw-inset-shadow-alpha{syntax:"";inherits:false;initial-value:100%}@property --tw-ring-color{syntax:"*";inherits:false}@property --tw-ring-shadow{syntax:"*";inherits:false;initial-value:0 0 #0000}@property --tw-inset-ring-color{syntax:"*";inherits:false}@property --tw-inset-ring-shadow{syntax:"*";inherits:false;initial-value:0 0 #0000}@property --tw-ring-inset{syntax:"*";inherits:false}@property --tw-ring-offset-width{syntax:"";inherits:false;initial-value:0}@property --tw-ring-offset-color{syntax:"*";inherits:false;initial-value:#fff}@property --tw-ring-offset-shadow{syntax:"*";inherits:false;initial-value:0 0 #0000}@property --tw-outline-style{syntax:"*";inherits:false;initial-value:solid}@property --tw-blur{syntax:"*";inherits:false}@property --tw-brightness{syntax:"*";inherits:false}@property --tw-contrast{syntax:"*";inherits:false}@property --tw-grayscale{syntax:"*";inherits:false}@property --tw-hue-rotate{syntax:"*";inherits:false}@property --tw-invert{syntax:"*";inherits:false}@property --tw-opacity{syntax:"*";inherits:false}@property --tw-saturate{syntax:"*";inherits:false}@property --tw-sepia{syntax:"*";inherits:false}@property --tw-drop-shadow{syntax:"*";inherits:false}@property --tw-drop-shadow-color{syntax:"*";inherits:false}@property --tw-drop-shadow-alpha{syntax:"";inherits:false;initial-value:100%}@property --tw-drop-shadow-size{syntax:"*";inherits:false}@property --tw-backdrop-blur{syntax:"*";inherits:false}@property --tw-backdrop-brightness{syntax:"*";inherits:false}@property --tw-backdrop-contrast{syntax:"*";inherits:false}@property --tw-backdrop-grayscale{syntax:"*";inherits:false}@property --tw-backdrop-hue-rotate{syntax:"*";inherits:false}@property --tw-backdrop-invert{syntax:"*";inherits:false}@property --tw-backdrop-opacity{syntax:"*";inherits:false}@property --tw-backdrop-saturate{syntax:"*";inherits:false}@property --tw-backdrop-sepia{syntax:"*";inherits:false}@property --tw-duration{syntax:"*";inherits:false}@property --tw-ease{syntax:"*";inherits:false}@property --tw-scale-x{syntax:"*";inherits:false;initial-value:1}@property --tw-scale-y{syntax:"*";inherits:false;initial-value:1}@property --tw-scale-z{syntax:"*";inherits:false;initial-value:1}@keyframes pulse{50%{opacity:.5}}
keygold logo
中文繁體
登入 / 註冊
keygold invite coupon新註冊用戶專享註冊領取優惠券
主站keygold arrow-right網誌keygold arrow-right鳴潮 3.1 領主級 BOSS「無銘探索者」全方位打法與掉落攻略
keygold search

鳴潮 3.1 領主級 BOSS「無銘探索者」全方位打法與掉落攻略

keygold blog author李星辞
2026/03/06
keygold facebook sharekeygold reddit sharekeygold twitter sharekeygold whatsapp share
keygold link

副本位置與解鎖條件

無銘探索者」的討伐入口位於羅伊冰原星盲墜落地區域,具體位置在星舟空間站內部。

24076411cbfdbf77b4477e9ca021411c.jpg

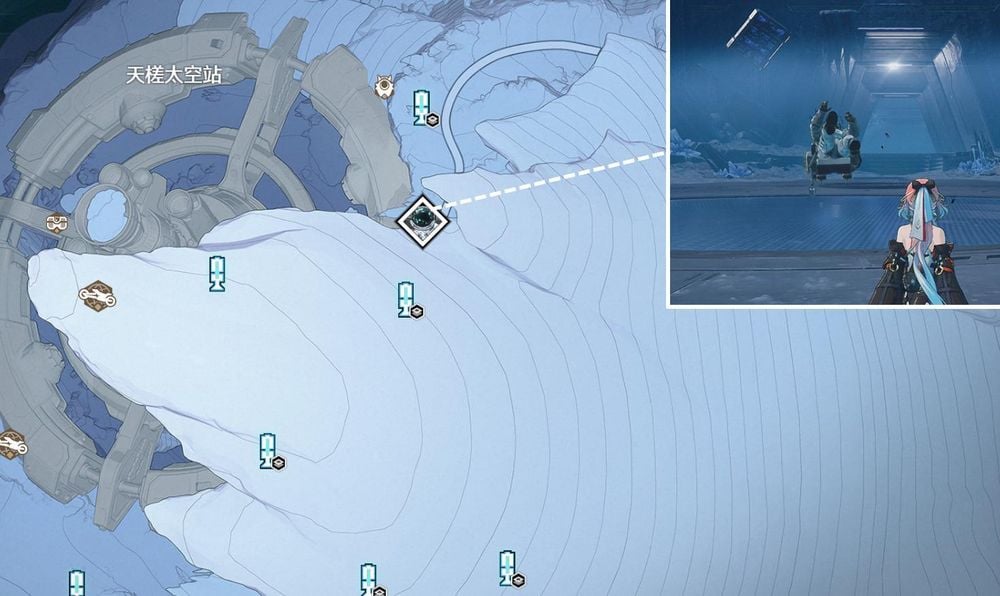
  • 常規解鎖:推進並完成 3.1 版本主線任務「遠航之星」後,即可正常進入該區域進行挑戰。

  • 提前挑戰:如果您尚未完成主線,也可以隨時透過系統指南中的首領挑戰功能,利用提前解鎖直接前往討伐。

戰鬥前置準備與整體策略

無銘探索者」具備極強的機動性與滯空能力,在正式接戰前,請熟記以下戰略重點:

  • 把握開場輸出黃金期:戰鬥剛開始時,BOSS 會進行一段較長的啟動與武裝動畫。請充分利用這段時間展開攻擊,提前打出一套完整的輸出循環壓低血線。

  • 制空權與破壞背包:BOSS 會頻繁升空,傳統近戰容易丟失目標。強烈建議編入具備遠程或強大空戰追擊模組的角色(如 3.1 新角色「愛彌斯 图片 」)。同時,利用大範圍技能持續攻擊並破壞其背部的飛行背包,能強制讓 BOSS 墜機倒地,創造絕佳的集火空檔。

階段技能拆解與應對指南

BOSS 的血量下降至 50% 時會進入第二階段,攻擊頻率與招式威力將大幅提升。

第一階段:常規空襲與硬控牽制

  • 致命擒抱與零距離鐳射:BOSS 會半蹲蓄力並閃爍紅光,隨後帶有「光圈」提示直接衝向角色進行抓取。應對:這是一招極度危險的硬控技能,一旦被抓住不僅會吃滿鐳射傷害,且期間極難進行治療回復。看到光圈務必優先進行彈反或側向閃避,絕對不能被其控制。

    a22987527151cbfec85ee728b125e1eb.jpg

  • 沖拳/蹬踹與空中鐳射:BOSS 躍至空中向角色砸下沖拳或蹬踹,隨後在空中反身發射鐳射,最後砸向地面。應對:節奏感很強的三段式攻擊,保持連續閃避並衝刺拉開的節奏即可。

    84459b1eb8c1caa9c9b23521672f11a0.jpg

  • 流星分裂攻擊:BOSS 躍起並擲出光球,光球會分裂成多顆流星砸向地面。應對:在光球擲出瞬間反方向衝刺遠離落點,或連續閃避。

    1d77bf66323941fde5238438c8a2a80d.jpg

  • 揮臂砸地與掃射:躍起揮臂砸地,隨後反身再次揮擊,並從下至上掃射鐳射。應對:攻擊範圍極廣,建議直接向兩側連續衝刺遠離。

    60bffb7889777ec4622faad9d2b27cd8.png

第二階段:半血強化與狂暴連招

進入第二階段後,除了繼承一階段的招式外,還會新增並強化以下致命攻擊:

  • 巨型鐳射斬擊:BOSS 會長時間蓄力,凝聚出一道超長的鐳射光束並向角色猛烈斬下。應對:注意觀察蓄力動作,在揮下的瞬間進行精準閃避。

    7b8929fa461752b5ef60276f6506d4fe.jpg

  • 四段衝刺與光球重砸:BOSS 升空並連續 4 次揮動光劍向角色突刺,最後雙手凝聚光球猛砸角色。應對:衝刺期間 BOSS 身上會頻繁出現「光圈」,推薦利用彈反打斷其突刺節奏;若錯過彈反,則需連續閃避規避最後的砸地傷害。

    69cd059ff2ea10bf316f73c3582f1c66.jpg

  • 死亡旋轉與強化重砸:在一階段揮臂掃射的基礎上,掃射結束後 BOSS 會在空中旋轉身體進行全方位的鐳射噴射,最後重砸地面。應對:範圍比一階段更大,看到其開始旋轉時必須不惜體力向外場衝刺。

    a6d8e7eaaf2c1cd34c9de701307fb515.jpg

核心掉落材料一覽

擊敗「無銘探索者」並消耗結晶波片後,可獲得以下重要物資:
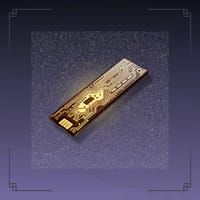
  • 專屬突破材料:「我們的選擇 图片 」(這也是 3.1 版本新角色「愛彌斯 图片 」等人的核心突破素材)。

  • 常規獎勵:聯覺經驗 图片 、聲骸·無銘探索者 图片 、高級共鳴促劑 图片 、高級能源核心 图片 、高級密音筒 图片 與貝幣 图片