Solara isn't the kind of Free Fire map where you can loot for five minutes, wander into zone late, and expect everything to work out. The map is too big, the terrain shifts too much, and the Slide Track system gives good players a massive green light to punish slow rotations.
That’s what makes Solara interesting. Aim still matters, of course, but this map rewards players who actually understand timing. The squads that rotate early, take cleaner routes, and avoid pointless mid-game fights usually enter the final circles with better positioning and more utility.
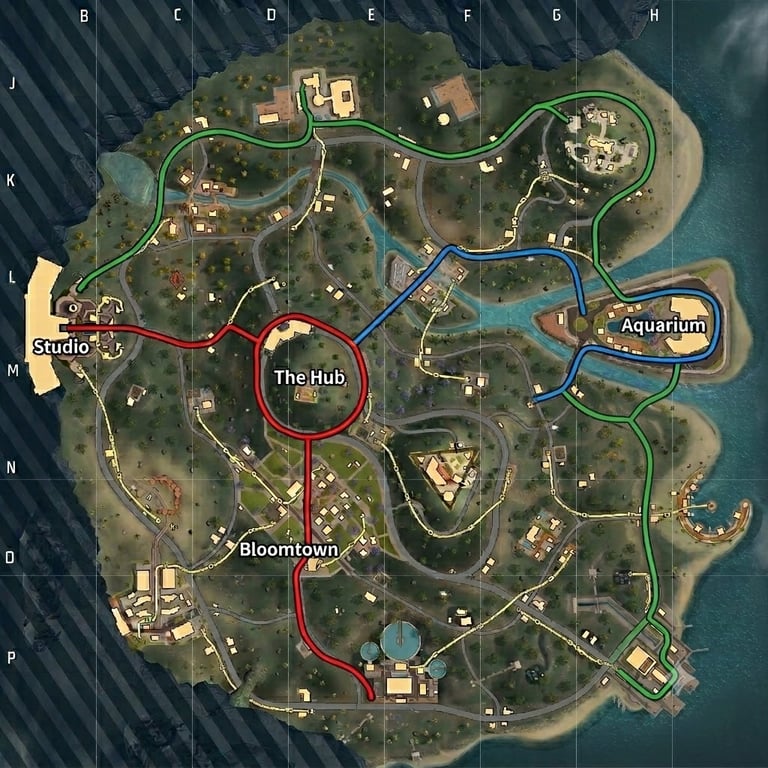
Garena officially introduced Solara as a 1400m × 1400m battlefield with dynamic weather, coastal terrain, futuristic urban zones, and a connected Slide Track system. Those features aren't just visual flavor. They shape how the map actually plays.
Below are five reliable rotation routes you can use in ranked matches, whether you are grinding solo, running duos, or playing full squad.
Why Rotation Matters So Much on Solara
Solara has more movement pressure than older Free Fire maps. On Bermuda, many players can get away with late rotations because the map is familiar and most choke points are predictable. Solara is different.
The Slide Track system speeds up movement, but it also makes rotations more readable. If you use the obvious route, experienced players can hold the exit and beam you as soon as you arrive. If you rotate too late, you are forced into open terrain or bad fights near the edge of zone.
That means every good Solara rotation should answer three questions:
- Where is the next safe zone likely pulling?
- Which team controls the high ground or buildings ahead?
- Can we rotate without being forced through a predictable choke?
Once you start thinking this way, Solara becomes much easier to play.
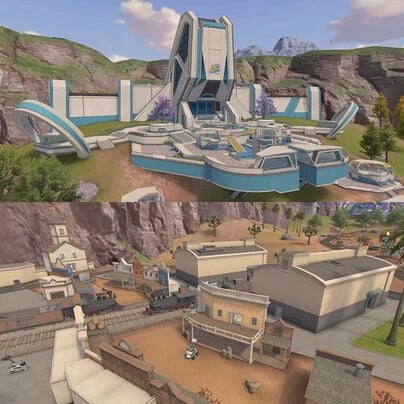
Route 1: Bloomtown to The Hub
Bloomtown is a strong landing spot because it gives you enough loot without forcing you into the meat grinder immediately. The buildings provide solid cover, and the area gives you several ways to leave depending on the first zone.
The mistake most players make is treating Bloomtown like the whole match. They win one fight, hear another team nearby, and spend the next two minutes chasing kills. By the time they finally rotate, The Hub is already occupied and every clean entry point is locked down.
The play here is simple: loot fast, take only the fight you have to, then shift.
When rotating toward The Hub, avoid the most obvious straight-line path if you already heard shots ahead. Use the edge buildings and terrain breaks to approach slowly. The Hub is valuable because it gives information, but it is also dangerous because multiple teams can collapse on it from different directions.
Your goal isn't to blindly rush into the center. Your goal is to arrive early enough to choose your angle.
Key Tips for Route 1
- Secure the perimeter first: Clear Bloomtown’s outer buildings before committing to the deeper structures.
- No babysitting: Don't overstay your welcome just because you won the spawn fight.
- Ditch the straight line: Approach The Hub using terrain breaks and edge buildings instead of sprinting across open space.
- Check for campers: Always scout the Slide Track exits—teams love to hold these angles for free kills.
This route is ideal for players who want consistent Top 10 finishes without playing completely passive.
Route 2: Studio to The Hub
Studio is one of the more active areas on Solara. It attracts players who want early fights, quick loot, and immediate tempo. If your squad is confident in close- and mid-range fights, Studio can be a strong opener.
The important part is knowing when to leave.
A lot of squads win their first fight at Studio and then instantly get third-partied. That happens because Studio creates noise. Once shots break out, nearby players know exactly where to rotate for free cleanup kills.
After your squad gets basic gear and secures the first fight, start moving toward The Hub. This gives you a better mid-game position and prevents you from being trapped by late-arriving teams.
One thing to keep in mind for current Solara play is the Studio rail and train area. Garena’s OB52 patch notes mention Santino’s mannequin interaction with Solara’s Studio trains and rails, so you should be extra careful around visual bait, fake pressure, and unusual movement in that part of the map.
Key Tips for Route 2
- Make a hard decision early: Take the first drop fight quickly or disengage immediately if it drags out.
- Filter out the noise: Do not chase every distant sound cue or bait kill.
- Beat the third party: Rotate out before nearby scavengers have time to collapse on your position.
- Control the map's eye: Use The Hub as your mid-game information point rather than a permanent fort.
Studio to The Hub isn't a “safe” route, but it is very strong for players who want to build momentum early.
Route 3: Bloomtown to Aquarium
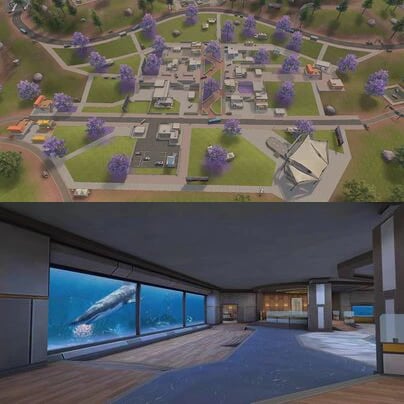
Not every Solara match needs to run through The Hub. If the zone pulls toward the coastal side, rotating from Bloomtown toward Aquarium can be a cleaner option.
This route works because it keeps you near cover for most of the transition. Instead of forcing a direct center push, you move through a more controlled path with buildings, angles, and safer pauses.
Aquarium is especially useful for players who like to play methodically. You can hold angles, check nearby movement, and avoid getting dragged into the heavy traffic near central map areas.
Garena’s OB51 patch notes included fixes related to Bloomtown and Aquarium building interactions, which reinforces that both areas have meaningful structure-based gameplay. In practice, that means you should treat this route as a building-to-building rotation, not a sprint across open space.
Key Tips for Route 3
- Leapfrog through cover: Use individual buildings as mini-checkpoints to scout the next leg of your run.
- Keep your utility ready: Avoid crossing wide open spaces without smoke grenades or Gloo Walls primed.
- Read the zone pull: Only commit to this route when the safe zone clearly favors the coastal side of the map.
- Watch your exit timers: Do not let enemies trap your squad inside Aquarium when the blue zone starts closing.
This is a good route for teams that prefer clean positioning over constant fighting.
Route 4: The Hub to Studio
The Hub is one of the strongest information areas on Solara, but it can also become a total death trap. Holding the center feels powerful until three separate teams start rotating toward you at the exact same time.
That’s why top-tier squads don't just sit in The Hub forever. They use it to read the lobby, then cash in on that early center information.
If the next zone allows it, rotating from The Hub toward Studio is a smart way to blindside teams that are still limping out of their spawn fights. You also keep access to buildings, rails, and alternate routes, which gives your squad far more flexibility than staying completely pinned in the center.
This route works best when your team communicates clearly. One player should watch the rear, one should scout the next angle, and the rest of the squad should be ready to either push or reset.
Key Tips for Route 4
- Don't overvalue the center: Abandon The Hub before the area becomes overcrowded with desperate edge-teams.
- Assign a rear-guard: Someone needs to actively watch your backside during the transition to catch late rotators.
- Identify weak targets: Pressure teams caught in transition, but avoid full-committing into unknown buildings.
- Keep your options open: Use the rails near Studio to reset if the fight turns messy.
The Hub to Studio route isn't about running blindly at every red dot. It’s about using early center information to pick high-percentage fights on the move.
Route 5: Edge Loot Area to Slide Track to Center Zone
This is the most beginner-friendly Solara route, and it’s still highly effective in Grandmaster lobbies if you play it with discipline.
Instead of dropping into a contested hotspot, land near a quieter edge location, gather basic loot, then use the Slide Track system to catapult toward zone once you actually know where the match is going.
The advantage is simple: fewer early coin-flip fights. A lot of ranked players die because they take messy drop fights before they even have armor, healing, or enough ammo. This route avoids that problem entirely. You give up early kill potential, but you gain massive placement consistency.
While this passive approach keeps you alive with basic floor gear, breaking into higher tiers eventually requires premium cosmetics and character upgrades that change your baseline stats. Spending your Free Fire diamond wisely on character voucher boxes or weapon wheel spins ensures you don't lack fire power when you are forced into late-game engagements. The danger is becoming too passive. If you loot the edge for too long, even the Slide Track won't save you from a late rotation.
Key Tips for Route 5
- Ditch the flight path: Land away from the plane's direct trajectory whenever possible to secure solo loot.
- Loot for utility, not perfection: Grab armor, heals, and working guns, then immediately stop looking at the floor.
- Move on information: Start your rotation the exact second the first zone boundary reveals itself.
- Scout the terminal: Always check Slide Track exits with a scope or drone before riding the rail blindly.
This route is perfect for players who want stable placement points while learning Solara’s layout.
7Advanced Solara Rotation Tips
1. Slide Tracks Are Not Free Safety
Slide Tracks are fast, but they aren't magic. Every fixed movement system creates highly predictable arrival points. Competent players know this, and they will hold those exits just to farm free kills. Before clicking that track button, check the kill feed, listen for local gunfire, and think about where nearby squads are likely migrating. If the exit looks like an obvious choke point, take the slow lane through the dirt instead. Fast is good. Predictable is dead.
2. Position Beats Extra Loot
On Solara, one more tier-3 attachment is rarely worth giving up the next circle's power position. Once your squad has basic armor, healing, ammo, and workable weapons, start moving. The earlier you rotate, the more choices you have. The later you rotate, the more the map chooses for you.
3. Use Terrain Before Using Gun Skill
On Solara, one more tier-3 attachment is rarely worth giving up the next circle's power position. Once your squad has basic armor, healing, ammo, and workable weapons, start moving. After all, the core of your gunplay—like weapon fire rates and character passive perks—is determined by your vault setup before the match even starts. If you are looking to secure the latest weapon crates or pass progression to edge out the competition, a reliable Free Fire top up is a much safer investment than greeding for floor loot while the blue zone is shrinking. The earlier you rotate, the more choices you have. The later you rotate, the more the map chooses for you.
4. Gunfire Is Information, Not an Invitation
If two teams are fighting directly along your rotation path, you do not always need to join the party. Sometimes the optimal play is to hold the exit, wait for the kill feed to slow down, and punish the surviving team while they are weak and looting boxes. That’s how you turn someone else's rotation into your free pressure.
FAQ
What is the total size of the Solara map in Free Fire, and how does it affect match pacing?
Officially, Solara features a 1400m × 1400m battlefield, making it significantly larger and more complex than older classic maps like Bermuda. This expanded area, combined with interconnected Slide Tracks and steep vertical elements, accelerates the mid-game tempo. Survival depends heavily on early, decisive rotations rather than passive edge-looting.
How can you prevent getting killed while using the Slide Track system on Solara?
Slide Tracks offer incredible mobility, but their fixed arrival terminals create highly predictable choke points. To stop enemies from gatekeeping your exit, always check the local kill feed and scout terminals using a scope or drone before boarding. If an exit is heavily contested, immediately drop off early or choose a slower, ground-based alternative path.
What major map updates were implemented for Bloomtown and Aquarium in the OB51 patch?
The OB51 patch notes specifically addressed and optimized building and structural interactions within both the Bloomtown and Aquarium sectors. These technical collision fixes stabilized structure-based cover, turning these coastal drops into premier hot-spots for close-quarters building fighters who prefer clean defensive positioning over open-field skirmishes.
How does Santino's character skill interact with Studio's trains and rails in the OB52 patch?
According to Garena's OB52 patch notes, update adjustments enhanced Santino’s mannequin teleportation skill around Solara's active Studio rail and train zones. Competitive squads must exercise extreme caution near these tracks, as high-tier players frequently deploy these decoys as visual bait to create fake pressure or escape messy third-party engagements.
Why are character vault setups and weapon skins more critical on Solara than picking up floor attachments?
Solara's massive scale means you cannot rely solely on the loot you find on the ground. Baseline competitive stats—such as weapon fire rates and passive movement perks—are determined by your pre-match loadout. Many competitive grinders utilize a reliable Free Fire top up to secure premium weapon crates or unlock meta character slots, ensures their account is fully kitted for late-game combat long before the first zone shrinks.

Finally, Solara rewards players who move with a definitive plan. The map is massive, the Slide Track system warps the pace of every match, and the vertical terrain makes macro-positioning more important than ever.
Depending on your rank and playstyle, your operational formula for the map should be optimized as follows:
- Solo Grinders / New Players: Edge Loot Area --> Slide Track --> Center Zone
- Consistent Ranked Climb: Bloomtown --> The Hub
- Aggressive Squads (Early Tempo): Studio --> The Hub
- Tactical Building Fighters: Bloomtown --> Aquarium
The golden rule for 2026 remains unchanged: Do not rotate late, and do not rotate blindly. Gather your information early, move before the lobby collapses on your position, and take your engagements from a position of strength. That’s how you master Solara.